
Hello everyone!
Last week I made a sundress that featured a square skirt (also known as a handkerchief skirt, which sounds fancier)

and I promised that later this week I would post a tutorial. Here it is!


Making a square skirt is really easy! It's literally a square with a big hole in the middle for your waist. The corners of the square create long, bias-cut triangles that can give your gown a dreamy and ethereal look.
 |
| Here's a line drawing for a square skirt, adapted from the line drawing for Anna Sui's Vogue 2968 |
Let's get started!

Easy DIY Square Skirt Tutorial
This tutorial will teach you how to make an easy square skirt that will fit your waist and drop to the length of your choosing. It can also help you predict how long the longest sections of the skirt will be versus the shortest parts.
What you'll need:
A tape measure
A calculator, or Google
Pattern paper, or some big roll of sewing paper that has inch markings on it
A pencil
Scissors: for fabric and paper
Fabric:- In my opinion, very lightweight, drapey fabric works best for this look because it brings out the fluidity of the pattern without creating too much bulk.
- How much fabric you need will depend on your size and the length of your skirt; this tutorial will help you figure out exactly how much fabric you'll need. As an approximation you'll probably need around 1 1/2 yards of 60-inch fabric or 3 yards of 45-inch fabric (significantly less if this is for a small child).
1. Measure your waist.
Take a tape measure and measure your circumference where you want the top of the skirt to sit (for me, I wanted a drop-waisted skirt so I took my hip measurement).
If you're using a non-stretch fabric, add 1-2 inches of ease to that measurement; if you're using a stretch fabric, you'll want to subtract 2-3 inches. Another option is to add an extra 4-5 inches to your waist measurement if you want gathering at the waist.
If you're franken-patterning (like me) and you're planning on sewing this skirt to a top, make sure that the circumferences of the bottom of the shirt and the waist of the skirt match!
2. Calculate your radius.
You're going to create a hole for your waist by cutting an even circle out of the center of your square skirt. You need to determine what the radius of that circle should be.

The radius is equal to your waist measurement divided by 6.28 (2π).
3. Decide how long you want your skirt to be.
This is a tricky question because, as you may have noticed, the skirt is not the same length all over!
To be able to draft a skirt pattern, you only need to know how long you want to have the shortest part of the skirt: your minimum length, in other words. However, it may be useful for design purposes to sketch out how long the extended, drapey sections will be, or you may prefer to work backwards from a maximum length.
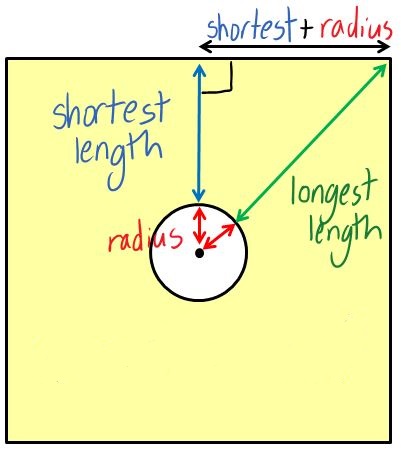
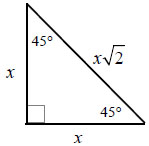
Ok, time for some really simple math. Here are the equations relating the long length to short length, and vice versa.

Play around with these relationships until you find a length you like!
***For those of you who are wondering where I got these numbers: I derived the equations from the length ratios of a 45-45-90 triangle, where the hypotenuse equals a leg times √2. The exact equations are below. Triangle diagram courtesy of GradeAMathHelp.com.

4. Draft your square.
After you decide on how long you want the shortest part of the skirt to be, you're ready to start drafting your pattern.

Take a large piece of pattern paper with inch markings, like the markings on the piece shown below.

Measure (or count) out the dimensions of your square. It will then be easy to follow the markings printed on the paper to create a straight pattern.

5. Draft your circular hole.

The radius of the circle you will cut in your fabric will be equal to the original radius corresponding to your waist measurement, minus the seam allowance that you intend to put between the skirt and your waistband or your Franken-top.
First locate the center of your square by folding it into quarters. When you unfold your square, the center will be the intersection of the vertical and horizontal folds.

And then using a tape measure, mark the radius-length away from the center at several points and connect them in a circle.

 |
| Make as many markings as you feel comfortable with. |
 |
| And then sketch out a cutting line. |
 |
| If I wanted to add side seams, I could cut along the dotted line and would add 5/8 inch to both pieces along the dotted line. |
If you're sewing this as part of a dress, you're ready to cut out of your fabric and add it to your top! If you're making a standalone skirt, you can finish the waist by sewing on a piece of decorative elastic that comfortably hugs your waist or by cutting out a waistband that matches your original waist measurement.
Thanks for reading my tutorial! Feel free to leave questions or links to your own finished square-skirts in the comments!
Thank you!
ReplyDeleteThank you
ReplyDelete