
(That means "I make crème brûlée" in French *nods knowingly*. The present tense is about all I can handle at this point. Freshman French, baby!!!)
Most people look at me very strangely when I explain to them that I am taking a second language as an elective; unlike my enlightened readers, they do not understand the personal benefits to be incurred by learning French. After all, Paris is arguably the food and fashion capital of the world. The great majority of the patterns I use have their instructions reprinted in French. And most pressingly, it sort of ruins your credibility as an aspiring chef célèbre if you can't even pronounce a French menu.
That would be me. :/
It's been very interesting gaining a cursory understanding of the language. All though I have to admit that thus far my food-related vocabulary hasn't improved much. The textbook makers apparently thought that us newbie francophones were not equal to actual vocabulary when they wrote the unit on café food, because all the dishes we learned were loanwords in English pronounced with the appropriate accent:
hamburger = OHM-BEHR-GEH
crêpe = CWEP
croissant = CWUH-SAW
But the interesting part is how if you translate something from English to French it immediately becomes fancier. Not because French sounds nicer, but because of actual objective English vocabulary. Frequently the English word for a fancy, luxurious item is just the mundane, boring, French word for the same thing! Case in point: The French don't have chairs; they have les chaises. French T-shirts are technically chemises. Forget your party, I'm checking out that soirée. Wouldn't it sound nice on a college app to say I blog about la cuisine et la couture?
The same basic philosophy holds true when talking about the dessert I made last weekend. Crème brûlée, translated literally, means "burnt cream". Yuuuuuuuuuuuummmmm. See if I told you that I was making me some burnt cream, you would not be tripping to invite yourself over.
 |
| Actual Yum |
 |
| Courtesy of HardlyHousewives.com |
*For those of you who don't have a blowtorch and for some reason don't want one, I found this cool idea for broiling the top of your desserts in the oven. I haven't tried it, but it's worth a shot!

La Crème Brûlée
Everything that is good about French cooking. Simple, uncompromising ingredients, and therefore absolutely delicious..
Makes 9 medium-sized servings, each serving filling a 4-inch diameter ramekin about an inch. If you want big servings you can make 6, and if you'd like your servings a little smaller you can also make 12 comfortably.
Ingredients
1 quart cream
2 vanilla beans (Dried are fine. Yes they are.)
1/2 cup sugar
6 large egg yolks
Another 1/2 cup of sugar--any combination of brown or plain white granulated--for the crust on top. (I use half and half for my topping.)
About a quart of water (not for the crème brûlée itself, but to put in the pan while it's baking)
And a butane hand-held blowtorch. Not to put in the crème brûlée. To torch it :D
Instructions
1. Put your quart of cream in a medium saucepan. Split the vanilla bean lengthwise and scrape the seeds into the cream (pictures and instructions below), and then drop the pod into the cream too. Put the cream on medium-high heat until it simmers, then cover it and let it steep for half an hour to an hour. Before continuing, remove the pods (NOT THE SEEDS) from the cream.
2. Preheat the oven to 325 degrees.
3. Whisk together the 1/2 cup sugar and the egg yolks until the mixture is homogeneous and lightens slightly. Add the warm cream to the eggs gradually, stirring constantly as you go (this is called tempering, and it keeps you from ending up with scrambled eggs).
4. Distribute the liquid into your ramekins (the number depends on how big you want your servings to be; see above).
5. Put your ramekins into a baking pan with a rim or a large Pyrex. Fill the pan with 2-4 cups of water (depending on the size) so that the bottom is completely covered by about 1/2 an inch. (If you can't fit that much water, it's not a big deal. You just have to make sure that all of it doesn't evaporate. The water evaporates in the oven, maintains a moist atmosphere, and keeps the tops of the crème brûlée from cracking.)
6. Bake at 325 degrees for about 50 minutes, until the crème brûlée are solid around the edges but jiggle a little in the center.
7. Take the ramekins from the water and refrigerate for at least 2 hours before torching and serving.
8. Prepare the sugar coating for the top. If you're using brown sugar, I recommend baking it (yes I know this sounds weird) for about 5-10 minutes first to dry it out. Combine with your white sugar and reserve.
9. When ready to serve, pull your crème brûlée out of the fridge. Using a sieve, sprinkle with a thin layer of sugar, just enough to completely cover the top, and blast with the blowtorch until the sugar browns and melts together, completely covering the surface with a thin sugary crust.
10. Enjoy!
How to use a vanilla bean:
 |
| the bean |
 |
| Using a small knife, cut it lengthwise all the way down the middle. It helps to hold onto the hooked end while you do it. |
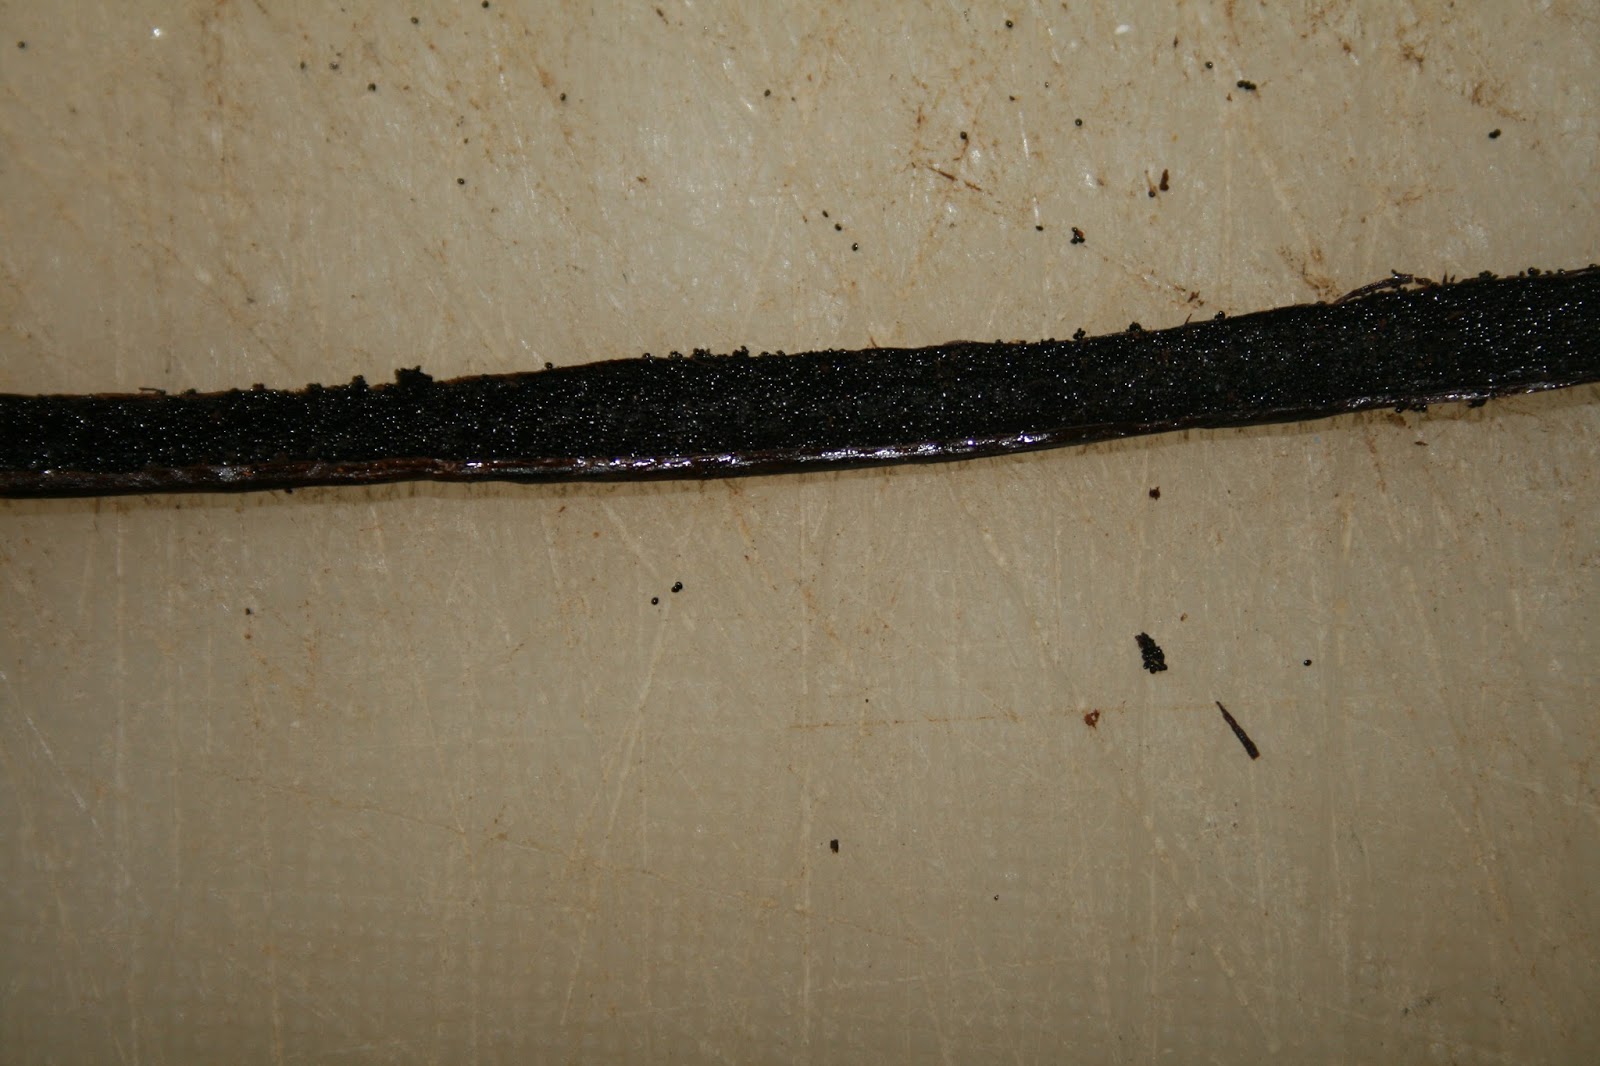 |
| Here's a great picture of what the seeds will look like on the inside. They are tiny, dark, shiny round beads--essentially the little specks you see in vanilla bean ice cream, all clustered together on the inside of the pod. |
 |
| Scrape the sharp edge of your knife along the side of the vanilla bean pod to scrape out the seeds. |
 |
| Cream and vanilla bean |
 |
| Egg yolks and sugar |
 |
| This is what your final custard should look like. |

 |
| See the water? |
 |
| Here's my toasted brown sugar...the things I do for stunning crème brûlée ;) |
 |
| My final sugar topping |
 |
| Using a spoon and a seive, you can get a thin uniform layer of sugar over the custard. Note: real chefs cook in pjs get over it :P |

 |
| THE FUN PART |


No comments:
Post a Comment